Due Today: 10s of motion design for critique (upload to Vimeo or D2L Assignments “Vimeo Overflow”)
AE Keyboard Shortcuts
- (s) scale, (p) position, (a) anchor point, (r) rotation, (t) opacity
hold shift to select multiple - (u) see all keyframes for layer
- (u + u) to see all adjusted properties
- (+) or (-) to expand or zoom on timeline
- (,) or (.) to expand or zoom composition panel, (shift + /) to fit to screen
- (j) or (k) key to jump between keyframes in timeline
- (shift + cmd + n) apply mask over text layer
- (cmd + double-click) on pan behind (anchor point tool) to center anchor point
- * add marker on timeline
For Today:
- P1 Crit
- Demo: Easing + Keyframe Interpolation, Parenting, & Graph Editor, Review Audio Guidelines

linear interpolation: Moves at a constant, steady speed between keyframes, like a mechanical motion. There’s no acceleration or deceleration.
example: elevator sliding up
bezier interpolation: Gives you precise control over the motion by adjusting handles manually. This allows for sharp curves and custom paths for smooth or dramatic changes. This is ideal when you need very specific control over acceleration, deceleration, and movement paths.
example: a bouncing ball manipulating the sharpness of the bounce
auto bezier interpolation: default spatial motion (moving objects) / AE automatically smooths the rate of change between keyframes, making it great for creating naturally curved motion paths.
example: a smooth camera pan or a drone flying through the air—you want the path to be curved but don’t need to manually control every part of it.
continuous bezier interpolation: auto smooth rate of change / AE automatically smooths the motion path for continuous, flowing movement. It’s a balance of manual control with automatic smoothing.
example: a leaf drifting through the wind—smooth, flowing movement with some control over how the leaf move through the air.
hold interpolation: only for temporal value / Used for sudden changes, like switching between two different values instantly without any smooth transition. Ideal for creating abrupt shifts in appearance.
example: a light turning on and off—abrupt changes.
AE Keyboard Shortcuts + Tips
- (right click) on keyframe > keyframe interpolation to change temporal or spatial interpolation
- (right click) on keyframe > keyframe assistant to add easing to keyframes
- (control + 8) set marker
- (cmd + click) on keyframes to change to auto or linear keyframe
- (option + click) on properties to move entire motion path OR select all keyframes
CONCEPT

NARRATIVE:
What is happening in your scene?

MOOD:
What is the overall feeling?

CONTRAST:
Is there an inherent or defined contrast you are building from?

FORMAL CHOICES:
Then…how are your design choices communicating the above?

3–5 things you want to change.
Today’s Resources
- Watch Video: Parenting Tutorial | 1:08m
- Optional Extension Videos for above Demos:
- Watch Video: Keyframe Interpolation | 5:10m (begin at 1:00)
- Watch Video: Smooth (and sexy) Keyframe Movements | 3:25m
- Watch (as needed) Video: The Graph Editor | 19:50m
- Watch Video: Time Remapping | 4:42m
- Watch Create Smooth Graphics By Fine-Tuning Your Keyframes in After Effects | Rocketstock
- Watch Roving Keyframes (up to 7:00m) (smoothing out time using positioning)
AE Demos


Curves = Acceleration and Deceleration
- A curved line means speed is changing. If the curve is going up, the object is speeding up (accelerating). If it’s going down, the object is slowing down (decelerating).
- When you see handles on the keyframes, use them to manually adjust how fast or slow the object moves. The longer you stretch the handle, the more gradual the change.
- Flat Lines = constant speed.
- Steep Curves = fast changes.
- Shallow Curves = slow changes.
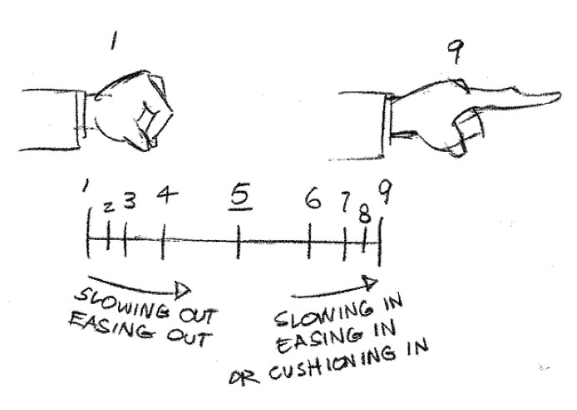
- Use Easy Ease to quickly smooth out your animation. After Effects will automatically create a curve to help an object slow down or speed up gradually. This is great for a natural-looking animation.
- Ease In: Starts slow, then speeds up (like accelerating from a stop).
- Ease Out: Starts fast, then slows down (like braking a moving car to a stop).
- Keep Learning: Create better eases in AE & Roving Across Time with Roving Keyframes
Audio Guidelines for Motion Graphics:
- Keep overall audio levels below -6dB to avoid distortion and provide headroom for adjustments.
- Dialogue/voiceovers should sit between -12dB and -6dB for clarity, and background music should be quieter, between -18dB and -12dB.
- Use keyframes to fade audio in and out at the start and end of your motion videos for smooth transitions.
- Balance audio layers (dialogue, sound effects, music) so no single element overpowers the others unless intentional.
- Monitor audio levels using the Audio Meters panel (found under Window > Audio Meters) to ensure consistency and avoid peaking above 0dB.
- Keep sound design simple—audio should complement, not distract from, the visuals.
- Keep Learning: https://www.premiumbeat.com/blog/sound-in-after-effects/
Looking Ahead
- Continue developing P1 motion design for 9.25 due date (remember to document all process work).
- 20–30s due next Thursday for final crit.
- Exercise 1 due next Tuesday, Sept 16th
Project 1 Schedule
- 9.16 – Demo: Track Mattes; Lecture: History of Motion Graphics (may move to later date); Studio; Assign E2
- 9.18 – P1 Final Crit #3 (30s)
- 9.23 – Exercise 2 Due; Studio
- 9.25 – SUBMIT P1; P1 Final Presentation; Begin P2; Lecture: Principles of Motion Graphics